- Epicurious 101
- Season 1
- Episode 88
7 Pasta Recipes Every Home Cook Should Know
Released on 12/24/2025
I'm Frank Proto,
professional chef and culinary instructor,
and today I'm gonna show you
how to make lasagna frank style.
We're talking cheesy, creamy, melty, and delectable lasagna.
This is Lasagna 101.
[gentle upbeat music]
[gentle music]
Making the sauce for your lasagna is definitely a process.
This is the flavor base of our lasagna,
basically the heart of the lasagna.
We're gonna build layers.
We're not just gonna dump everything into the pot at once.
We're gonna brown things off, season things as we go
so that we have a really nice balanced sauce at the end.
Everyone has their own way of making lasagna.
Mine tends to be rustic, a little more homey.
There are lasagnas that you make a bechamel sauce
and it's silky and creamy.
But at the end of the day I want this to be super accessible
to you out there.
I have my pot on the stove. I have been getting it hot.
I'm gonna add some oil.
I'm gonna get my pork, and I'm gonna season it up.
I'm using a pork country style rib.
It's got a really good fat to meat ratio.
I feel that pork and tomatoes
really kind of blend well together,
and it gives your sauce this really nice mellow taste.
So spread them out in an even layer.
So it starts to get brown.
And at this point I say this a lot, leave it alone.
Once it starts to get brown,
it's gonna unstick from the bottom of the pot
and then we can move it around.
But give it time.
The pork in the pot's gonna take five to seven minutes.
Remember, we're building layers of flavor,
and this is where we want to be.
If you look at that,
that is the brown that we want on most of the sides.
If they're not all brown like that, we're okay.
But try and get some brown like that
on at least two or three sides of your pork.
So while that's browning,
I'm gonna come over and get my sausage ready.
I got sausage in the casing.
You just get a paring knife, cut off the casing.
I chose spicy Italian sausages,
'cause I want a little heat in my sauce.
I love the flavor that the chili flakes give.
The sausage adds a little more fat,
adds a little more flavor.
We're gonna get a little more deeper flavored sauce
when we use two types of meat.
All right, so the pork is now getting nice and brown.
Look at that. That's what I want.
You can see that the pork is also giving off some fat,
is that fat's gonna help us brown our vegetables?
The pork looks like it's done.
I'm gonna take it out and put it into a bowl,
but I'm gonna use a slotted spoon,
'cause I wanna leave the fat in the pot.
That fat is one of those foundational pieces of our flavor.
So don't get rid of the fat.
If you look at the bottom of the pan,
what do I have in there?
You guys should know this by now. It's called fond, F-O-N-D.
And that is all the little brown bits
and caramelized pieces of pork
and the juices on the bottom of the pot.
Do not get rid of that.
This is again part of our flavor basin foundation.
I'm gonna leave the fat in the pot
and then I'm gonna take my sausage,
and I'm gonna get that into the pot.
I don't want large chunks in there,
so I'm gonna break it up and start browning this off.
My sausage is ready to go.
Even if it's not fully cooked now I'm not too worried
because it's gonna be in the sauce for a long time
and it's gonna cook through then.
So I'm just gonna turn this pot on really low right now,
and I'm gonna get that same slotted spoon
and take the sausage out
and just put it right on top of my brown pork ribs.
Try and leave some of those juices and fat in there.
Fat equals flavor, people. Don't be afraid of it.
If there's a little left in there, it's okay.
Don't worry about it. Put that aside.
It's gonna go back into the pot in a minute.
Now's the time where we start to get our vegetables going.
Onions go in.
Whenever I put onions in the pot,
I always add a little bit of salt.
Part of that layering of flavor
is seasoning throughout the process.
If we add a little salt as we go,
we get a nice balanced seasoning to our finished sauce.
I want you to take a second
and listen to what's going on in my pot.
Yes, I said listen.
I hear snap, crackle, pop.
I hear sizzling not hissing and that's what you want.
If you hear hissing, that means we're steaming our onions
and not sauteing them.
So if all you hear is hissing, turn up your heat,
maybe a little more oil.
But we want to hear snapping and crackling
and popping and sizzling.
Now's the time to add some of the more aromatic vegetables.
We're gonna add the carrots and we're gonna add the celery.
I have about two ribs of celery and about two small carrots.
And this I don't worry
about getting caramelized at this point.
I just want it to start to soften a little.
The celery and carrots are getting nice and soft.
And the garlic goes in last in this process
because garlic burns really quickly.
And we're gonna cook the garlic till it's fragrant.
I don't need to brown it,
I just want to smell roasty garlic.
The garlic is nice and toasty.
And the next thing we're gonna add is dry white wine.
This is gonna give our sauce a nice roundness,
a little bit of acidity.
It's also gonna help pick up all of the fond
from the bottom of the pot.
Those little brown bits are gonna get mixed in with the wine
and make our sauce nice and caramelized.
While my wine is cooking down,
I'm gonna make a bouquet garni.
Sounds fancy but basically it's just a bundle of herbs
that we tie with some butcher twine.
I have basil, I fold the basil into itself a little,
and then I twist around.
Opposite directions so that you meet in the middle
and you can tie.
We bundle it together so it's easy to remove.
It adds flavor to our sauce,
but then we can take it out really easily.
Throw that in right now
and just let our wine continue to cook.
The wine's been happily bubbling away.
If I take a whiff, the alcohol is cooked off
and it's time to move on to the next step.
I'm gonna add the tomatoes.
And I chose a ground peeled tomato.
This is a great place to save a little time.
If I got whole peeled tomatoes, I'd have to grind them up.
These don't have any skins in them
and they're the right size for our sauce.
All the tomatoes go in,
save the cans 'cause we're gonna rinse them out.
And I used to think that this was done
just to get the rest of the tomatoes,
but there's another reason for it.
When we add water to our sauce,
it gives our sauce a longer cooking time,
which gives it more time to develop flavor.
If we just add the tomatoes in,
it's gonna reduce too much too quickly.
So what I'm gonna do now is,
let the tomatoes come to a simmer.
I'm gonna add a nice grinding of fresh pepper,
a nice pinch of salt, a little bit of chili flake
'cause we do have hot sausage in there,
but I do wanna supplement that with a little more heat.
Stir that in, let it come to a simmer.
So let's give it a taste.
You gotta be careful here because this is gonna reduce,
but I do think it needs a little more salt.
Just a nice pinch. Stir it in.
The sauce is bubbling away.
I'm gonna lower my heat from high to medium,
and I'm gonna add all the meat back with all of the juices.
Give it a stir.
You can probably go a little lower on the heat
to kind of medium low.
Let it cook low and slow for about an hour and a half
until everything comes together, the pork gets tender
and then we can make our lasagna.
My sauce has been on for about an hour and a half.
If you look at it, it's got a really nice deep red color,
a little sheen of oil on top, which is always nice.
And the pork is nice and tender.
So what we're gonna do now
is we're gonna remove that bouquet garni.
It's done its work. It's given its flavor up for the sauce.
And we're also gonna remove our pork
so that we can kind of just chop it up and shred it.
So go through the sauce.
When you cut into that lasagna,
you want to get the perfect bite every time.
And by shredding the pork, we're allowing that to happen.
The pork has been cooking long enough in the sauce
that we really don't need to do much to shred it.
It falls apart really nice.
And this goes right back into the sauce.
Now I'm gonna take this basil and shred it up
and add it to the sauce.
A lot of times when you're cooking things like this
for a long time, they can get kind of heavy
and like kind of stodgy.
And the basil just kind of gives it a little lift
towards the end.
My sauce looks really good,
but I am gonna adjust the consistency a little
with some water.
I'm using dry pasta for this.
So the pasta's gonna soak up a lot of sauce.
And I don't want it to be too wet or too dry.
So a little liquidy on my sauce is where I want to be.
We've taken all this time to build the layers in this sauce,
and it's totally paid off;
it's time to make our lasagna.
[gentle music]
It's time to assemble lasagna.
And most of the hard work is done already.
We've made our sauce.
Assembly can be a lot of fun,
but it's also a crucial step
in getting the right consistency.
You don't want to add too much sauce,
you don't want to add too little cheese.
Remember, we want that perfect bite all the way through.
The first step to layering our lasagna
is you want to put a nice bit of sauce on the bottom.
We don't want it sticking to the bottom
or drying out on the bottom so the sauce goes down.
Lasagna already takes a lot of time and effort.
I like to use dry pasta because it's simple and easy.
There are some pasta products out there called oven ready,
which are no cooked pastas.
I'm using regular pasta.
I have seasoned my sauce, I have adjusted consistency.
The pasta's gonna soak up all that good flavor.
It's gonna go right into the pasta
instead of just salted water.
When I'm layering my lasagna,
I like to put sauce on the pasta itself, right?
So it's gonna be sauce, pasta, sauce, and then the cheese,
'cause I want the sauce to soak into the pasta.
Next step, we're gonna add some of our grated cheese.
I have Pecorino and Parmesan.
I like the sharpness of Pecorino.
I like the nuttiness of Parmesan.
I'm going to add some shredded mozzarella.
I'm using a low moisture mozzarella.
Fresh mozzarella has a lot of liquid.
I don't want extra liquid in there. And then some ricotta.
And with the ricotta, I dab it on, right?
This will spread out and melt a little,
but I just like to put dabs around.
So we're just building those layers of flavor.
And when I use all these cheeses,
it gives me that nice balance between creamy and acidic.
And then another layer of pasta.
I am going to push down just a little, right?
I want this to be a little compact.
I don't want it to be, like light and fluffy.
I want it to be nice and dense.
So if the pasta overlaps a little, that's fine.
And then another layer of sauce.
Remember, the pasta should be touching the sauce.
And then we go again with everything else.
And you notice that I'm getting into the corners as well.
Make sure we're spreading this evenly.
And it's not just a lump of cheese in the middle
that each corner piece is gonna have some cheese flavor too.
And for our last layer,
I'm just gonna add the grated cheeses.
I don't want the ricotta on top there,
because ricotta tends to dry out and it's gonna get crumbly.
I leave the ricotta insides
where it's gonna stay nice and moist and not on the top.
Before I put it in the oven,
I'm gonna put it onto a sheet tray or a cookie sheet.
You can see that our sauce
is kind of like almost overflowing,
so if it overflows, it goes onto the tray, not into my oven.
Last thing we need to do is cover this with foil.
I want to keep a lot of the moisture in there.
And I kind of want it to steam just a little
'cause I didn't cook the pasta.
So we'll put this on nice and loose.
We're gonna throw this in a 350 degree oven
for about 30 minutes.
Remove the foil and then go for another 30 minutes
to crisp up the edges, and then we'll be ready to taste.
The lasagna's been in the oven for 30 minutes.
We're gonna remove the foil to allow our lasagna to crisp up
and the cheese to melt really nice.
You'll notice that a lot of the juice has leaked out
onto the tray.
That's kind of sacrificial juice,
it's probably gonna stick to the tray.
But that's why it's important to have it
so it doesn't leak all over your oven.
The foil on top has allowed my pasta to soak up that liquid
and my cheese to steam a little and get melty.
It's going back into the oven for about 30 minutes
and that's gonna get nice and crispy and brown.
I took the foil off the lasagna,
put it back in the oven for another 30 minutes,
and now it's out.
Look at it. It's gorgeous, brown, cheesy deliciousness.
But I don't want you to cut into it right away.
It's extremely important to note
that you need to let this rest
for a minimum of 30 minutes before you cut it.
Otherwise it's a sloppy mess.
What's great about lasagna
is that you can take it in this form,
you can refrigerate it, you can cut it up and freeze it.
You can pretty much save it
and serve it any way you want it,
but you have to let it rest before you cut it.
[gentle music]
My lasagna has rested for 30 minutes.
We've given it time for everything to kind of meld together.
Let's cut into this. All right, here we go.
Make sure it's sliced all the way through.
I usually run the knife along the outside edge
just to make sure that it's free.
Get under there.
Oh my goodness, that is just a slice of happiness.
We took our time to layer our sauce
on top and on bottom of the pasta.
And if you look at it, all that time has paid off.
We have a beautiful layered lasagna
with a little bit of everything in each bite.
I'm gonna make a mess, but I'm gonna get in there
and just take a nice chunk.
It's cheesy, it's meaty, it's melty and creamy.
It has a little acidity from those tomatoes.
The pasta still has a little bite. It's not soft and mushy.
It holds together really well, and it's beautiful.
It takes time, it takes technique,
but it is worth every moment you put into it.
Put it in front of the people you love
and they will love you back.
I'm Frank Proto, professional chef and culinary instructor,
and today I'm gonna show you the best way
to make spaghetti and meatballs frank style.
We're talking tender and flavorful meatballs,
a deep rich tomato sauce, perfectly cooked pasta
that will put a smile on anyone's face.
This is Spaghetti Meatballs 101.
I prefer my meatballs fairly small like golf ball size.
The outside is browned off first.
The inside is super juicy and tender.
This is a close approximation of my grandmother's recipe.
I think it makes a nice, consistent, delicious meatball.
[gentle music]
If you go to Italy and ask for spaghetti meatballs,
they'll look at you like you have three heads.
It's not really served together.
This is actually a classic Italian-American dish.
I have some ground beef. I have my ground pork.
I know that my grandmother would put ground veal in this.
I'm just trying to simplify a little.
Make sure your ground beef is at least 80-20.
That means 80% meat, 20% fat.
If they're too lean,
they tend to be a little on the dry side.
I'm hitting this with some fresh garlic.
I have Pecorino Romano cheese. Pecorino is sharp.
It has a lot of flavor to it in a small amount of cheese.
You can use Parmesan if you want.
I'm using plain breadcrumbs, not seasoned.
I want to control the seasoning.
For this recipe, it's about a cup and a half.
The breadcrumbs make your meatballs more tender.
Sometimes people will add milk to this, right?
And that's kind of a classic Italian-American thing as well.
I don't think that it needs the milk.
I like to use just eggs and I use a fair amount of eggs.
I have four here for this amount of meat.
Back when my grandmother was a kid,
meat was a little harder to come by.
Meatballs were away of them.
Taking that little bit of meat and extending that.
You add breadcrumbs that are cheaper.
You add cheese, you add eggs that are cheaper than the meat.
And you're making this really nice thing
that instead of just feeding one or two people,
you can feed five or six.
Don't forget the seasoning.
Lots of fresh cracked black pepper
and then a fair amount of salt.
The breadcrumbs, the eggs, and the cheese here
make your meatballs more tender.
They actually grab onto a lot of those juices.
If you just use a little bit of breadcrumbs
and not a lot of eggs or cheese,
you're gonna get a really meaty meatball
that actually tends to be a lot drier, a lot more crumbly.
And what I like to do is just break up my yolks
and start to mix
some of the dry ingredients together on top.
And then I bring my meat in,
and I'm gonna start to work this.
A lot of people say, oh, don't work the meat.
It's gonna be tough.
No, no, no, no, we wanna work this
so it's really mixed well.
People tend to think you can overwork meatballs.
We're not gonna harm this from working it.
This feels like it's a little wet to me. So what do I do?
I get my breadcrumbs and I just add a little more.
If you look at the side of the bowl, it's kind of wet.
I want side of the bowl for the meat to pull away from it
and not to be sticky.
If I pick a piece up now, it's super sticky.
So I want this to firm up a little more.
So let's mix those other breadcrumbs in.
It's starting to look a little drier.
It's forming one big nice mass.
Almost, like, needing it like a bread.
This is the texture I'm looking for.
It's slightly sticky,
but when I roll my meatball, it holds its form.
That is a nice mixture.
So I'm gonna cook a little taster
before I actually ball up my meatballs.
And this is just to ensure
that I have the seasoning and the texture right.
This is one of those steps
that a lot of home cooks will skip
that I find is super important.
Just put a little olive oil in your pot.
We're gonna get a little piece of meat, flatten it out,
it goes right in the pan.
This is what makes restaurant chefs
different from home cooks is we're constantly tasting,
we're seasoning, we're adjusting.
And that's what you do here with meatballs.
All right, let's taste this
to make sure the seasoning is good.
But I think I need a little more salt.
Don't include too crazy. A little more pepper.
Don't be afraid to take the two minutes
and make a taster.
Okay, get in there, remix, and we'll be good to go.
[gentle music]
One of the other things I do as a chef
that makes my meatballs super consistent
and the right size is I use an ice cream scoop.
This ice cream scoop
is definitely small than your average ice cream scoop.
This is actually called a disher.
It's a portion scoop that they use in restaurants.
This is a good trick to make sure
that your meatballs are uniform.
I just line up my meatballs like soldiers here.
I take the scoop, I get the meat in there,
I push it against the side and then scrape it.
Basically packing it into the scoop.
And all my meatballs are uniformed.
I think meatballs
that are really huge are a little offensive.
I like a two bite meatball.
If you want them bigger, go for it.
If you don't want to use a scoop and don't have a scoop,
usually what I'll do is this.
So I'll take a meatball,
and I'll kind of just put it into the cup of my hand,
and then you pretty much use your hand as the guide.
The meatballs are kinda rough, so just take a few seconds,
roll in between your hands.
So this is just for looks.
You can easily just drop them into your saute pan.
A little bit better for presentation.
Meatballs are rolled out. Let's brown them.
[gentle music]
Browning in meatballs is a key step.
We're sealing the outside of the meatballs,
sealing that moisture and juiciness in.
We're also getting some browning in the bottom of the pan
and some fat from the meatballs.
So I feel it's really important
just to give you a full flavored sauce
as well as a really nicely cooked meatball.
Some people will take the meatballs raw
and just throw it into tomato sauce.
I think that they fall apart
and you'll have more of a meat sauce than a meatball sauce.
This is the way my grandmother did it
and I think it makes a better flavored sauce.
So I have some olive oil.
We're not frying the meatballs,
but I want some fat in the pan.
It's starting to get a little bit glistening.
We're starting to see ripples and a little bit of smoke,
some out of medium high heat.
And all we really have to do
is start putting our meatballs in.
And I'm only gonna put them in on one layer.
This point is really just concerned with browning.
Getting a nice crust on the outside of these meatballs,
creating layers of flavor.
I'm using a pot that's actually called a braiser.
It's a shallow sauce pot that's wide. I love this pot.
We can put a lot of meatballs in.
It's heavy cast iron with enamel on it. It holds the heat.
And I'm not too worried about cooking
all the way through right now.
If things are a little raw here, it's not a big deal.
Because these are going back in the sauce
and they're gonna cook
for a good 30 to 40 minutes in the sauce.
It's actually better if they're a little raw in the middle.
If you cook them too long in the fat,
you're actually gonna dry them out
and get a crust on the outside that gets way too firm.
So don't go too crazy with browning them.
Just roll them around
and they stay nice and juicy and tender.
Notice how I'm using tongs. I'm not squeezing them too hard.
I'm just kind of delicately moving 'em around.
I don't want them to fall apart.
And I'm still over medium-high heat.
If these are getting brown too quickly,
adjust your heat, lower it down.
[meatballs sizzling]
I'm saving the pan. I'm saving all the fat in the pan.
Don't be afraid of this fat.
It's actually gonna make our sauce taste better.
[gentle music]
We saved our pot from browning the meatballs.
We have that beautiful brown bits on the bottom, that fond.
Our oil is still in the pan.
And what I'm gonna start with is the onions, right?
Onions take a little time to cook.
Onions lend a little sweetness to my sauce.
We're gonna cook our sauce for more than 30 minutes.
That lends sweetness as well. My oil is all warmed up.
I have it on about medium heat,
and then I can add my onions.
These are just chopped onions, fairly small.
For the most part,
these are gonna fall apart and melt into our sauce.
It's a little bit of salt. It draws out the moisture.
It starts the seasoning process.
So while my onions are cooking, I have basil,
and I'm gonna pick the leaves off for later.
I want to use the leaves
to kind of like give my sauce a little bit of pop,
but I'm gonna save the stems.
They have tons of flavor. I get my bay leaf.
And I'm basically gonna just bundle these together.
I get a little butcher's twine,
and I'm gonna make myself a bouquet garni,
which is basically just a bouquet of spices or herbs.
Tie these together.
And this is just one of those techniques
that I think that as a chef I've done throughout the years.
And it makes my sauce so much better.
As our onions go translucent and start to get soft,
we can add our garlic.
Once my garlic starts to smell a little toasty,
I can add my tomatoes.
This was my grandmother's brand that she used.
It's kitchen ready. I do not like skins in my tomato sauce.
I make sure that my tomatoes are always peeled.
So this goes right into your pot.
Get as much out as possible. Give it a quick stir.
Again.
What I do at this point is I'm gonna add some water.
And I used to think
this is just my grandmother being frugal,
but believe it or not, this has a purpose.
By adding water to our sauce,
we're actually slowing down the cooking process.
If we don't add water, the tomatoes reduce too quick
and they're gonna be acidic and not sweet.
If I didn't add the water,
my sauce would be too thick, too quick.
I want to give it time for those flavors to develop
and my sauce to reduce and really kind of meld
with all the other flavors in the pot.
So at this point, you can see it's starting to bubble.
I'm gonna add my sachet, get those herbs in there.
If you look on the side of the pot,
sauce always sits to the side of the pot.
I am constantly getting my spoon in there
and scraping that down.
A lot of people will just leave it there,
it'll start to burn.
I like to scrape the side of my pot.
That's basically just reduced tomato
adding more flavor to your sauce.
I'm gonna season up right now, salt and black pepper.
I'm gonna go fairly light on the seasoning
because I want to season throughout.
So you can see that we're starting to get bubbles at top.
We do not want this sauce to boil.
Boiling leads to reduction.
We're gonna reduce it too quickly.
I want this to happily bubble away.
So we want this to go on low heat at this point.
And we can add our meatballs.
[gentle music]
So our sauce is bubbling away happily.
I bring it to a simmer, I lower it down,
and then it's time to add the meatballs.
And basically what I do
is I just get my meatballs and I slide 'em in.
If there's any juices on this pan, if you see any juices,
make sure you scrape that in, that's flavor.
It's on medium-low heat.
I make sure that they're all submerged.
And I just let this bubble away happily.
Stirring, occasionally scraping my sides
for about half hour to 45 minutes.
So we've got some reduction.
I can see that it's not as liquidy as it was.
I'm gonna take my sachet out.
This is not edible. Just get rid of that.
Well, I do want to taste it before I serve it. Good.
It does need salt. It does need pepper, right?
This is a good time to add our basil.
This is gonna add a little pop,
a little freshness to our sauce.
So I just like to tear it. It's looking good.
I think we're ready to go.
All we need is a little bit of pasta.
We could plate it up and give it a taste.
[gentle music]
I'm gonna plate this kind of granny style
the way my grandmother would've done it.
I'm gonna take some of my sauce,
put it in the bottom of a big bowl.
It's kind of family style.
Grab my cooked spaghetti right into the bowl.
So my pasta is just a really good quality boxed pasta.
We cooked it to al dente,
and then we're just gonna toss it in the sauce.
You don't have to go to fresh pasta
with spaghetti and meatballs.
Use your favorite boxed pasta and you're good to go.
Now I want you to look at what I got going on here.
All the pasta is coated, but it is not drowning in sauce.
This is classic pasta 101.
We don't want it to be swimming in the sauce.
It's easy to add more sauce.
It's near impossible to take any sauce away.
And then I'm gonna add my grated Pecorino.
Don't be stingy. Use good cheese.
This is fresh grated Pecorino Romano.
Don't buy the stuff in the can or the shaker.
And then I'm just gonna take some basil leaves
just to accent that basil.
If they're really big, give 'em a tear.
So I'm gonna plate some meatballs here
just for presentation sake.
And that is basically my grandma's style
spaghetti and meatballs.
Typically, if I was having a Sunday dinner
at my grandmother's house, this is how the setup would be.
We'd have the nice plated pasta
with the sauce and some meatballs and some garnish,
and then we'd have a bowl of sauce,
a bowl of meatballs, and cheese
so that people can dress their plates the way they want it.
Time to plate this baby up and give it a taste.
I grab some pasta again on my plate.
I'm gonna get a meatball 'cause I want to taste.
So I'm gonna taste the pasta by itself first.
Gimme a little bite, just to see how my sauce is.
[gentle upbeat music]
What I love about this sauce is that it's cooked
but not cooked too long so it's not too dense or deep.
It still has that nice bright tomatoey we flavor.
Of course, the Pecorino cheese every single time
does it for me.
My meatballs are super tender.
You cut 'em with the side of your fork.
They're not falling apart.
They're cooked all the way through. They have great flavor.
We made sure they had great flavor
'cause we did our little test.
Meatballs are perfect.
We could serve this plate of pasta
to any Italian-American grandma.
You might get a kiss, you might get a kiss on both cheeks.
Taking the time, putting the effort in
and making this sauce at home is well worth it.
You choose the ingredients, you choose the seasonings,
you can make it custom to what your family likes.
And you just can't do that with store-bought food.
I'm Frank Proto, professional chef and culinary instructor.
And today I'm gonna show you
how to make the best fettuccine Alfredo at home.
We're talking silky creamy, classic fettuccine Alfredo.
This is Fettuccine Alfredo 101.
Fettuccine Alfredo is a classic dish
that you normally don't see in restaurants in Italy.
It's basically pasta with butter and Parmesan;
Pasta al Burro or Pasta Con Parmesano e Burro.
The American version of fettuccine Alfredo uses cream.
This is more the original version
that came from Italy to America.
Real fettuccine Alfredo only has three ingredients.
Butter, Parmesan cheese, and pasta.
It's all about the technique.
And once you get that down,
you're gonna make it perfectly every time at home.
[gentle music]
One thing I talk about all the time is mise en place.
This dish comes together really quickly
so you have to have everything close by.
One of the main ingredients in our fettuccine Alfredo
is Parmigiano Reggiano cheese.
It is really, really important
that you use real Parmigiano Reggiano from Italy.
You can tell that it's real
because it's gonna be stamped Parmigiano Reggiano
on the outside.
You're gonna see that rind.
The Parmigiano Reggiano and the butter
when you mix it together,
emulsifies the sauce and makes it creamy.
One of the key factors of this dish
is getting good ingredients.
Because there are so few ingredients,
getting the best you can afford is really, really important.
So I'm gonna start grating my cheese.
It's really important that your Parmesan cheese
be finely grated.
I'm using a microplane.
If you don't have a microplane,
you can grate it on a grater
and then sift it or strain it
just to get the big chunks out.
But I want this cheese to be nice and fine
so that it melts once it gets hot.
So you can see that this microplane does that really well.
Part of the reason I don't use pre grated cheese
is that I can't tell if it's real, right?
Someone could be selling me Parmesan cheese.
And I don't see the rind, so I don't really trust it.
Second of all, it's usually not ground fine enough.
And a lot of times when you buy pre grated cheese,
there are things in the cheese
that will stop it from clumping.
Like they'll use anti-caking ingredients.
And that does not do well for us
when it comes to making the finished dish.
Sometimes also in pre-grated cheese, it's very moist.
And this cheese is usually super dry.
And that makes our product a little string in the end.
So grate your own cheese, it's worth it.
So it does look like a lot of cheese.
And I'm basically gonna use like three quarters of a pound
or a pound of cheese to a pound of pasta.
It's indulgent. This is a luxurious dish.
It is cheesy, it is rich. Don't skimp on the cheese here.
The cheese is grated.
And what's funny about this dish is,
this is really the only action
or the only misplace you have to do.
[gentle music]
Have a pot of boiling water.
And usually chefs tell people
to use a large pot of boiling water.
In this case, I want a smaller pot. I want less water.
When pasta cooks, it gives off starch.
I want this water to be extra starchy
so when we add it to our pasta,
that starch will help bring the sauce together.
Generally for pasta dishes,
I would use a larger pot with a lot more salt.
But because we're using Parmesan, it's super salty.
And I don't want this dish to be over salted.
So I'm just gonna use a little bit of salt in my water.
I'm not gonna go crazy.
I just want some seasoning to get in the pasta.
I chose to use dry pasta in the box.
Now, a lot of people say, well, Italy,
they all eat fresh pasta all the time,
but that's not really true.
A lot of people use dry pasta in Italy.
You could use fresh if you want. It's up to you.
But I like to use dry.
It has a little more starch to it.
And I like the way it comes out a little bit better.
You wanna try and find the best pasta that you can afford
because it's gonna make the dish better.
Because this dish has so few ingredients,
every ingredient matters.
A lot of times chefs will say,
they want their pasta al dente.
Al dente means, to the tooth.
Which means there's a little bit of bite.
You bite into your pasta;
there's no white center, but it has some true to it.
I'm going just past al dente here.
So you can see as I store the pasta,
the water gets cloudy, and that's what I want.
That cloudiness is the starch washing off of the pasta.
I'm using a butter with high butter fat.
It's a little creamier.
There's less liquid or solids in this.
I've used this Plugra or Kerrygold unsalted butter.
So I would try and find a European butter.
This will really help the emulsification
to help the dish come together.
This pasta comes together really quick.
Have your plates ready to go.
Have all of your other mise en place ready to go.
And serve the pasta to your guest immediately.
The best way to check if your pasta is done
is to actually taste the piece.
People say, oh, throw it against the wall.
No, it just says our pasta starchy. It's good.
I think it needs another half a minute and we're good to go.
Once this pasta is cooked, we need to go quickly.
It is not something you can kind of wait around and chat.
You wanna have everything ready to go.
Basically, I'm using the pound to pound to pound rule.
I got a pound of pasta, a pound of butter,
and a pound of cheese.
And it seems like a lot.
But again, this dish is super luxurious
and meant to be eaten in smaller quantities.
So we're not gonna skimp on anything.
We got lots of cheese, we got lots of butter,
and we got beautiful starchy pasta.
Deep cleansing breath.
Let's start. The pasta is ready to go.
So I'm gonna shut my water off.
Notice I don't have a colander or a spider
or anything strainer.
What I'm gonna do is take my pasta directly
out of the water.
Let it drain for like a second,
and then drop it right into my butter.
Some of that pasta water is clinging to my pasta,
and that's what I want.
I'm not gonna throw this pasta water away yet
because I might need some to adjust the final dish.
And this is where we start to mix, right?
I'm gonna start to melt my butter,
and this is where the key of the technique is.
We're gonna continuously keeping it moving.
We want the butter to emulsify
with that pasta water and the pasta.
And I'm gonna start adding cheese.
You don't wanna be shy with this cheese. Go a little crazy.
I have a little extra cheese in case I need it.
But we're gonna mix, mix, mix.
And because I use the microplane on this,
you'll see that my cheese kind of melts right away.
We gotta keep it moving, keep it moving, keep it moving.
And that's what's the most important thing is here.
I'm gonna add a little more cheese.
You could measure this out perfectly,
but I'm gonna do it by eye
because I want this to look a certain way.
I want it to look creamy and delicious.
The main component here is the technique, stir, stir, stir.
We want to continue to stir
until the sauce starts to look creamy.
So you can see that my sauce is kind of tight.
I can add pasta water.
But look, once I add that water,
you'll see that it starts to look creamier and creamier.
I use a glass bowl for this
because a metal bowl will disperse the heat,
whereas a glass bowl holds that heat together,
nice creamy sauce.
It starts to look like we added heavy cream to this,
and we didn't add any heavy cream.
It's all about the technique.
That pasta and that cheese is emulsified.
And that's what we want.
It's all about the stirring
and getting our pasta super creamy.
You might be tempted to do this in a pan over a heat source.
And the reason I chose a bowl
is because if you overheat this sauce, it breaks.
So you're gonna have an oily mess
with the cheeses and clumps
and the butter breaks and gets greasy.
When the butter breaks,
that means that the fat and the solids separate.
So you're gonna get greasy fatty stuff
and chunks of butter solids and cheese.
One of the most important things with fettuccine Alfredo
is to get it on a plate and get it in your mouth
as fast as possible.
Let's plate this up.
So we can go on the plate. You can see this is super creamy.
Now, if you have guests,
you don't really have to put this on a platter,
you can go directly onto their plates.
But this is the presentation here.
Look at how creamy that sauce is.
And you can see why when this dish came over to America,
people thought there was cream in it,
because it does actually look like
there might be some cream in here,
but it is just butter, pasta water, and Parmesan cheese.
Look at that.
If that doesn't make you smile,
you got no joy in your life, people.
So I do have a little bowl of cheese here on the side
in case you or your guests want to add more cheese.
But I would suggest tasting it first the way it is.
And if you need more cheese, add more cheese.
To be honest with you,
there is so much cheese in this dish already.
They probably won't need it,
but it's always good to give your guests the option.
Let me go onto my plate. That is gorgeous.
I'm gonna bring it close so I don't lop it all over myself.
I'm not a spoon guy here.
I just twisted around my fork, right?
It's creamy, it's buttery.
It's got some really nice bite from the Parmesan cheese.
You don't need a big bowl of this.
Give small portions, absolutely delicious.
Like who could you serve this to that would hate this?
Remember, this is a super, super simple dish.
It's all about the technique.
You get that technique right and it's gonna be beautiful.
So you might have to practice, but it's well worth it.
I'm Frank Proto, professional chef and culinary instructor,
and today we're gonna make foolproof carbonara.
I'm gonna teach you how to make carbonara
that's luscious, creamy, and full of flavor.
This is Carbonara 101.
Carbonara is one of those dishes
that can seem super complicated,
but in the end it's really easy.
And all you really need is a few techniques.
If you follow all of my techniques,
it'll be foolproofed every single time.
[gentle music]
One of the most important ingredients in carbonara
is black peppercorns.
Now, I like to grind my own.
But before I grind 'em, I like to toast them.
And toasting is gonna give us this really nice,
nutty, deep black pepper flavor.
So put it over kind of medium low heat.
And we're just gonna put the peppercorns in
until I start to smell that they're fragrant.
And it's just a subtle nuance
that makes this dish so much better.
Make sure we're moving our peppercorns around
so that they toast evenly.
So what I'm looking for here
is that I can smell my peppercorns getting fragrant.
They start to kind of like move around in the pan a little.
You'll see a little jump a little, right?
We might hear a little pop.
And once I hear that first popping, I take it off.
I don't really wanna go any further than that,
'cause then we're gonna get it overcooked.
I'm gonna let these cool on this tray.
And in the meantime,
I'm gonna start prepping my other ingredients.
[gentle music]
One of the keys to a foolproof carbonara
is to gather all of your ingredients.
You need everything within arm's reach.
So when I cook my pasta, I'm not waiting for anything.
I can make it right away.
Now that my peppercorns have cooled, I can crush them.
Now you could use a pepper grinder if you want,
but I'm gonna use the old classic technique.
I get the pan, I hold it down with my hand here,
body weight down.
So I'm pushing and rolling.
[peppercorns crackling]
Almost like you're doing a lever, right?
I'm pushing down on this side
and crushing my peppercorn and rolling.
So I can smell as I crush
that these are super fragrant, super nutty.
That toasting brings out those flavors.
We get the oils out.
And I don't want this to be super fine.
I want it to have some texture to it.
We're talking about how to take this dish
from just kind of a standard dish to just that much better.
And as a chef, grating your own cheese is super important.
For my carbonara, I choose to use two cheeses.
I'm using Parmesan cheese and I'm using Pecorino.
And I do buy the good stuff for this.
I go to the Italian cheeses.
If you can get it, go for the best cheese you can find.
I like to use a microplane for this.
Now, microplane is a very fine grater.
When this cheese melts, I want it to be nice and fine.
I don't want to get shreds in there.
I want to get this beautiful fine cheese
that's gonna make my sauce super silky in the end.
What I like about using two cheeses here
is the Parmesan gives me a nice nuttiness,
and it gives me a really great kind of earthy flavor.
Whereas the Pecorino is super sharp,
and it's got a lot of bite to it.
So look, I have a lot of cheese here
and that's a good thing, that's what I want.
So this is for about four servings.
Now that my cheese is grated, I can get to my eggs.
For carbonara, I like my eggs to be room temperature.
So what I'll do is I'll set them on the counter
for about a half hour before I make the dish.
Because if they're cold, that's gonna slow everything down.
I'm gonna put hot pasta and cold eggs.
And the dish isn't gonna come together and emulsify right.
So eggs are the binder for this dish.
This is what brings the whole thing together.
And I'm going to use three whole eggs and two egg yolks.
And what I like to do is crack my egg in half
and just run my yolk between the shells
until the white all runs out all the way.
A lot of times people will just use straight eggs for this,
and that's okay, but the yolk is a lot of fat
and the white is a lot of liquid.
So by adding the extra yolk,
I'm adding more fat to the dish, more richness to the dish.
The next thing I'm gonna do
is I'm gonna mix my eggs and cheese together.
And this is a really important step
because I want this to be a smooth and creamy sauce
around my pasta.
We want to get this into a nice homogenous mixture
so that when we actually add the pasta to it,
we don't get scrambled eggs.
Not a good look for carbonara.
All right, so let's just take the cheese,
dump it into the eggs, and we can just get this together.
And you'll see,
it's gonna get kind of like a thick, creamy mixture.
Get that all in there.
I use a whisk just to get this together,
but I'm not gonna use a whisk past this point.
But you can see the mixture looks nice and creamy.
It's come together.
There's no bits of eggs or bits of cheese
that aren't mixed in, and that's what I want.
This is super important getting your carbonara
to the right finished texture.
At this point I want to add a little bit
of my toasted black peppercorns, right?
Give it a shake.
Get a little bit of your finely ground stuff.
Get a little bit of your bigger chunks.
So my egg and cheese mixer is ready to go.
And now it's time for the star of the show, the guanciale.
And this is super traditional for carbonara.
Now if you don't have guanciale,
if you can't find it where you're at, you can use panchetta.
I've seen bacon be used.
Traditionally, guanciale's used for carbonara.
And that's the jowl or the cheek of the pig
that's been cured, salt cured.
Sometimes they rub it in spices
and sometimes in peppercorn.
But it's just cured, it's salty, it's fatty, it's delicious.
And that's why they use it. It has that fattiness.
When we cook it out, we get a lot of fat
that helps make our sauce smooth and creamy.
So when it comes to guanciale,
I like nice big chunks of it.
So I like to cut my own; I don't like to buy a pre-cut.
So I want to get nice mac sticks or big mardones or chunks.
Don't be shy. I want them to be super visible in my dish.
So you see I have, kind of like, this matchstick
or a very thick matchstick.
So we're gonna cut those into nice chunks.
I don't want any wimpy little chunks.
I wanna see this guanciale. It's a beautiful ingredient.
It's got some meat on it, but it's not super meaty.
Now that I have my guanciale cut, my eggs, cheese,
and pepper mixture, we are ready to make our carbonara.
[gentle music]
You'll notice in front of me,
I have all the ingredients I need within arm's reach.
This is one of those things as a chef
that you have to set yourself up
towards proper mise en place.
My water is boiling.
I'm going to add some salt to my water.
I want my water to be basically sea salty.
And I'm using dry pasta.
It holds the sauce really well.
I like to use spaghetti for this.
I like the shape, I like the way it holds onto the sauce.
I like the bite to it.
Pasta's gonna take about 10 minutes,
and in that time I'm going to get my guanciale ready to go.
So turn your heat on.
I like to use a little olive oil in my pan
before I start cooking my Guan cha
people will say, what, Chef Frank?
The guanciale has a lot of fat.
I like to put this in the pan
to get the process going quicker.
My guanciale is gonna brown a little more evenly.
I don't really have to wait for that fat to render out.
So a little bit of fat in my pan to start
is the way that I always go.
We're gonna cook this until it is light golden brown.
You can hear it start to sizzle.
I don't want this to be crisp.
I want it to have some chew to it in the end.
So we're not gonna brown it all the way.
We want to keep all the fat.
A lot of people say, whoa, that's a lot of fat.
We're gonna put that in the pasta.
Yes, we're using all the fat. The fat is key to this dish.
It's also going to emulsify with the egg yolks
and make this sauce super creamy.
Don't forget to get in there
and stir your pasta occasionally.
We don't want it sticking.
Well, how do you tell if pasta's done?
If you look at it right now, it's still very firm, right?
We want it to be nice and al dente,
which means to the tooth.
We don't want it to be overcooked.
We want it to have a little bite to it.
My guanciale's ready to go.
You can see it's still bubbling away.
It's not completely done.
But if I leave it in the pan and keep it hot,
it's gonna continue to cook.
I don't want it to get any more crisp in this.
So I think my pasta's ready.
The best way to determine if it is, is to take a piece,
try not to burn yourself and actually taste it.
And that's good to go.
A lot of people will mix carbonara in a pan.
And I don't like doing it in a pan, right?
Pans retain heat.
I'm afraid my eggs might overcook and get scrambled.
So I like to mix everything in the bowl
that I mix the cheese and eggs in.
So let's take our pasta out, right?
I drain it, but I don't drain it too well.
We want to get a little bit of that pasta water in there.
The pasta water has starch. It has a little bit of salt.
So this goes right into my eggs.
And this is gonna start that process of cooking those eggs.
And then guanciale and all the fat goes in. Don't be shy.
And then we mix. I have a pair of tongs.
And here is the key here.
We want to mix, mix, mix, right?
We want that egg and that cheese to start to cook.
We want that fat to be emulsified into the sauce.
But look at that, right, super creamy.
Those eggs start to cook. It smells cheesy.
Oh my gosh, nice big chunks of the guanciale,
which this is the important part here.
We're emulsifying the sauce around the pasta,
all of that fat from the guanciale's getting in there.
And we get this beautiful luscious, creamy sauce.
Look at that.
It's almost like magic when this sauce comes together.
Give it a little twist.
I'm gonna take some of my guanciale, put it on top, right,
get some of that creamy guanciale from the bottom.
I'm gonna take a little more of my toasted black peppercorns
and just a little more of my Pecorino and Parmesan cheese
as if there wasn't enough already.
And that is foolproof carbonara.
[gentle music]
Time to dig in. I'm so excited.
This is one of those dishes
that waits for no man, woman, or child.
You wanna make sure you eat it while it's hot
and ready to go.
Make sure you get a little bit of everything in there.
[gentle upbeat music]
The sauce is silky and creamy
'cause I took the time to get everything mixed really well.
The guanciale has some chew to it.
We get a little bit of spiciness from that black peppercorn
and the mixture of both cheeses, sharp, and kind of earthy,
I think, makes this carbonara
one of the best versions you'll ever have.
[gentle upbeat music]
It's not complicated.
Takes a little technique, a little bit of love,
and just makes every part of you happy.
Not only your tummy, but your soul as well.
[gentle upbeat music]
I'm Frank, professional chef and culinary instructor,
and today I'm gonna show you
how to make the perfect mac and cheese.
You'll learn all the techniques
to make a perfectly melty sauce.
Pick just the right pasta and a crunchy topping
that takes it over the top.
This is Mac & Cheese 101.
Mac and cheese should be creamy, cheesy, and comforting.
Now I'm gonna show you a method that skips the flour,
skips the baking, using one special secret ingredient.
That's how we're gonna take this comforting side dish
and make it the star of the show.
[gentle music]
When it comes to cheese, for my mac and cheese,
I like to choose three different types.
Cheddar for sharpness, gouda for flavor and creaminess.
And then I'm gonna use some grated Parmesan
to give it a little bit of zing.
Something sharp, something creamy,
and something really flavorful.
By following that basic formula,
you're gonna solve a lot of the problems
that people usually make when they make mac and cheese.
If you don't choose the right cheeses,
you're gonna end up with kind of a oily sauce that's broken.
My Parmesan here is freshly grated.
I'm gonna put this aside;
I don't need to do anything with it.
But I do wanna grate my other two cheeses.
Now, first of all, with the gouda,
I'm gonna take some of this brown skin off.
It really doesn't melt well.
And because it has that smokiness to it,
it kind of dries out and gets rubbery.
So what I do is I cut it into manageable pieces.
And then I get my grater.
I put the grater flat and push.
This way I'm kind of using my body weight
to push the cheese.
I feel like it takes a little less time.
It actually takes a little less effort
as far as I'm concerned.
Once the cheese grater gets full,
you can push it and dump it to the side.
So there's my shredded gouda.
I'm gonna take the block of cheddar, make it manageable,
the grater's on its side, and we push.
For mac and cheese, I feel it's super important
that you buy a block of cheese and shred it yourself.
Pre-shredded cheeses have anti-caking agents
and cellulose in them.
I find that that lends to a gritty sauce.
So buy the block of cheese, take a minute or two,
and grate your own cheese.
And I promise you, if you use my method here,
it's gonna be quicker and easier.
[gentle music]
Ideally with mac and cheese,
you want a cheesy bite every time.
Basically, the pasta is the sauce delivery vehicle.
The ideal pasta for mac and cheese has holes, ridges, curbs,
and this pasta delivers.
Today, I'm using elbows.
So when we cook our pasta, we're basically gonna do it
the same way we do every other pasta.
We have a boiling pot of water;
we're gonna add a fair amount of salt.
Not quite sea salty, but salty enough.
Make sure the pasta goes in when it's boiling.
For the most part, this just keeps the pasta from sticking.
If you don't have this piece of equipment in your house,
you should get one.
It's called a spider. I'm gonna give it a stir.
But we don't wanna constantly stir the pasta
because that's gonna break it up.
We just wanna make sure
the pasta's not sticking to the bottom of the pot
or to the other pasta.
I'm cooking the al dente, because the pasta is gonna absorb
some of the moisture from the sauce,
and it's gonna make our pasta softer.
So if I go al dente,
my pasta's gonna have a little bit of bite to it
and not be mushy.
When I add the sauce,
the pasta's gonna be the perfect consistency.
The pasta is ready. And how do I know that?
Because I took a piece
and I put it in my mouth and tasted it.
That's pretty much the only way you know
that the pasta is where you want it.
And it's the right texture.
I'm putting it onto this flat tray
so that it cools fairly quickly.
I like to use the spider
just in case I want to save some of the pasta water.
So there's my cooked pasta.
You'll notice that I did not rinse my pasta off.
The starch on the pasta is gonna help the sauce stick.
You're also going to rinse away a lot of the salt
that you put in there and the seasoning.
[gentle music]
If you like a dried out brick
where the sauce is kind of iffy,
please by all means, put it in the oven.
What I like to do is make a crunchy topping
that kind of hits those notes of that crispy cheese on top
without it going in the oven.
Putting a mac and cheese in the oven tends to dry it out,
and this method kind of avoids all that.
My topping is straightforward. It's pretty easy.
We're gonna put our pan on medium heat.
We're not gonna go too high. I'm gonna add my butter.
The butteriness kind of mirrors
that creaminess of the cheeses.
It's gonna coat those breadcrumbs and let them brown.
I'm gonna add my garlic while the butter is melting.
Fresh garlic is gonna give us a little crispiness
'cause they're gonna get crispy with the breadcrumbs.
It's also gonna give you a cleaner flavor
than, say, a garlic powder.
Once I start smelling that fragrant garlic,
I'm gonna add my breadcrumbs.
They are panko breadcrumbs,
which are just dried out Japanese breadcrumbs.
It's not super fine. They have some chunkiness to 'em.
So I'm gonna add some salt, add some black pepper,
a little bit of paprika, and then a little bit of cayenne.
Stir this all up, giving it a little shake.
We're gonna get a nice color from that paprika.
A little bit of heat from our cayenne.
Give it a shake so it doesn't burn. I think we're good.
Shut it off. Let's get it onto our tray.
By putting it on a tray,
it's gonna basically stop for rest that cooking.
And what I'm gonna do is just spread these out
so they cool quickly.
Put them aside
for when we're ready to top our mac and cheese.
Using toasted breadcrumbs is a great alternative
to get that crispy top
without putting your mac and cheese in the oven.
[gentle music]
So now it's time to make my sauce.
And if there's one special ingredient here
that I use that is possibly out of the norm,
it's this magic little powder here.
This is sodium citrate.
It's a type of salt that will bind the fat
and the proteins of the cheese together
and make a super creamy sauce.
So it's an emulsifier.
And emulsifier is something that takes two things
that don't normally stick together
and it sticks them together.
In our case here it is fat and protein.
This is the modern chef's secret weapon
for creamy mac and cheese or cheese sauces in general.
Sodium citrate is not only gonna add
a little bit of seasoning
because it has salt in it or sodium.
The citrate part is derived from citric acid,
so it's gonna add a little tang as well.
If I don't have sodium citrate,
I will just add some American cheese
that has sodium citrate in it,
and that's gonna carry some of the sodium citrate properties
to your finished sauce.
Let's start with medium heat butter in the pan.
I'm gonna add my onions in,
and I'm gonna add a pinch of salt on those onions
just to dry out some of that moisture.
And I'm just gonna let these cook
until they are translucent, not brown.
I'm starting to see a little sizzle there.
I'm gonna add my garlic.
And I always add garlic second,
just because onions take longer to cook,
and we don't wanna burn the garlic.
So onions are starting to get there.
Starting to smell really good.
And like I said, this adds a nice savory background
to our dish.
So my onions are getting translucent.
And at this point I'm gonna take my milk.
All the milk goes in.
So the milk here is just the base of our sauce.
I usually do more sauce than I need.
This sauce holds really well in the fridge,
plus when I add it to the pasta, I like to have extra sauce.
My milk is in there.
And then I'm gonna take my sodium citrate.
I'm gonna let that dissolve.
I'm gonna hit this with a little black pepper right now.
And I'm gonna just bring it to a light simmer.
I want my sodium citrate to dissolve
and I want my milk to get hot.
For milk isn't hot or cheese is not gonna melt.
My milk is hot now.
And what I'm gonna start to do
is whisk some of my cheese in.
So common mistake people will make at this point
is they'll add all the cheese at once.
And what that's gonna do is it's going to cool our milk down
and the cheese is not gonna melt.
So just sprinkle it in and whisk as you go.
So just add slowly.
Add a little bit of my Parm, a little more cheddar.
So my sauce is thickened up with the cheese.
But as a final step, I'm going to add a stick blender in.
[stick blender whirring]
I'm gonna add my cream,
and I'm gonna add the last of my butter.
And this is really gonna smooth it out.
[stick blender whirring]
All right. It's looking pretty good there.
It's smooth, it's creamy.
I don't mind if it's a little dense right now.
If I think it's too thick, I can always add a little milk.
But I like this density here
because the denser it is, the less liquids in there
and the less liquid that's gonna go into my pasta,
that's gonna stay as a sauce.
Look, we have a nice flowy sauce, right?
I want you to listen. What do you hear?
Nothing. Silence.
That's what we want. No plopping, silence.
We don't want plopping this in our sauce.
[gentle music]
Time to assemble this. I have my nice cheesy sauce.
I'm gonna lower it down. I don't want it to scorch.
And now it's time to add the pasta.
It's really simple at this point.
You notice I have a lot of sauce
for the amount of pasta.
Like I said, I like double the amount of sauce.
I do think it makes it extra creamy and delicious.
So all I'm gonna do now is stir in my pasta
and make sure I get it hot.
Look at that.
Some of the sauce is gonna get soaked up by the pasta
as it heats.
So we could eat it just out of the pot.
But I'm gonna put it into a serving container
just so that I can serve it
with my delicious, crispy topping.
So the elbows that we used,
the cheese is getting into all the cracks and crevices.
And then I have my prepared breadcrumbs from earlier.
We wanna get some crunchiness in every bite
without drying out our pasta.
And done. Easy peasy.
So my mac and cheese ready to go.
I think it looks spectacular.
There's only really one more thing to do right now
is to taste.
So I'm gonna take a little here. Let's look at it.
It is not dry. Onto my plate.
The sauce is super rich, really cheesy.
You can taste a little bit of the garlic and onions
in the sauce, as well as the garlic in the topping.
It gives it just the right amount of crunch
with the maximum amount of saucy creaminess.
That there is the ultimate mac and cheese.
If your mac and cheese is stressing you out,
you're doing it the wrong way.
You don't have to be an expert
to bring it to the next level.
Mac and cheese is comfort food.
Use simple ingredients, use good technique,
and it's gonna come out beautiful every time.
Hey there, folks.
My name is Andrew Rea aka Babish.
And I'm here today to show you how to make cacio e pepe.
The new school, high-tech, unbelievably easy way.
This is Cacio E Pepe 101.
Cacio e pepe means cheese and pepper.
It seems so simple because it only has five ingredients.
But it's so difficult because you're effectively
just trying to emulsify together,
a hard aged cheese and water.
So it's very difficult not to break the sauce,
and usually ends up with a melty, stringy, oily mess.
But I have a solution,
and it comes courtesy of Luciano Monosilio,
a celebrated Italian chef.
We're gonna make a much milder sauce, a much easier sauce,
a damn near foolproof sauce, thanks to a blender.
This comes together very, very quickly,
only using these two cooking vessels.
This for cooking the pasta, a nice wide shallow pan.
The water's salted and there's not too much water in there
so it gets nice and starchy.
So you've got more emulsifiers
to try and get the cheese sauce to come together.
And then this pan
is pretty much just for toasting the peppercorns
and bringing everything together.
You're hardly cooking this pan.
Because the pasta takes 9 to 11 minutes,
we're gonna start that boiling.
Partially, bring it out like that
so you can sort of spread it out in a beautiful fan pattern.
And just keep it moving a little bit.
Make sure nobody's sticking together.
Instead of just dry roasting the peppercorns,
I'm gonna toast them in a little bit of butter.
It helps stabilize the emulsion
and it's nice to have fat in there
to round out some of those sharp edges.
While that's going, we can grate our cheese,
Pecorino Romano and Parmigiano Reggiano,
because Pecorino Romano is much sharper, much funkier
and Parmesan is gonna help round it out a little bit.
We're gonna put this stuff in the jar of our blender.
There we go. We got our butter nice and foamy here.
I'm gonna add our peppercorns to it.
Gotta be generous with the pepper.
This has got you cacio e pepe.
It's literally in the fricking name.
I got this pot on very low
'cause I don't wanna brown the butter.
I don't wanna burn the peppercorns;
I just want it to be a nice warm place
for everybody to live.
The most scientific method for testing pastas doneness
is to take a strand and throw it in your mouth
not against the wall.
That's pretty good.
So now toss it with the putter and the peppercorns.
I would've just eat this the way it is.
But legally speaking, we have to put cheese out.
So while the blender's running,
I'm gonna slowly stream in I pasta cooking water
until we get a nice thick sauce.
[blender whirring]
All right.
So we have now an incredibly creamy, dreamy sauce.
So between the pasta water, the starch in the blender,
it just created a near unbreakable emulsion.
Like you can see this.
We could heat this, we could bring this to a fricking simmer
and it would not break.
I guarantee it.
It's about as creamy as cacio e pepe gets.
When you're serving pasta it's nice to use tongs,
and then give it a twist
so it's got a little personality to it.
Maybe a little bit more cheese grated over top.
Grating up pepper.
And there you have it,
foolproof, unbreakable, unbeatable cacio e pepe.
[gentle music]
Cacio e pepe normally sets up,
almost immediately turns into a block.
This stuff super creamy and super delicious.
It's super pepe.
[gentle music]
You could have made cacio e pepe 50 times
and you still might screw it up
because it's so sensitive, it's so persnickety.
And this is not only a method
that results in, I think a better cacio e pepe
because it's creamier, it's lighter,
but also a completely foolproof and very easy method.
After this thing sits for a little while,
it is gonna start to get a little gloppy.
But a little splash of our hot pasta cooking water
should bring it roaring back to life.
That's why pasta cooking water is worth its weight
in not gold necessarily, but some neodymium.
I'm Lish Steiling. I'm a professional chef.
And today, I'm gonna show you
the real way to make Bolognese.
We are talking silky, savory, comforting Bolognese.
This is Bolognese 101.
The misconceptions of Bolognese are pretty much
that it's just a meat and tomato sauce.
The layers of flavor in this recipe are everything.
From browning the meat, to adding the vegetables,
to making sure that you caramelize the tomato paste,
to reducing the milk, to adding the wine,
all of it has a purpose.
It takes time and patience, but really it's not complicated.
[gentle music]
A dutch oven is perfect for a sauce like this
because it cooks for a really time.
And the bottom is nice and heavy
so that you prevent scorching.
You're gonna get her going over medium, high-ish heat.
Add a good amount of olive oil to the bottom of this pan.
So our oil is dancing in the pan.
It's moving freely, leaving ribbons.
I'm gonna start with my ground beef.
I'm using 80-20 here.
I'm gonna start to brown that.
As this beef is cooking,
I'm breaking it up with a wooden spoon
'cause I want all of that meat
to be nice and fine so that it clings to the pasta.
I'm not gonna cook it fully here
because I'm gonna add the vegetables.
And as those cook, the meat will continue to cook
and start to brown.
So it's again, just layering all of these flavors.
You can see there's even some fat we're doing out
from the meat, onion, finely chopped,
a carrot finely chopped as well.
The carrot adds sweetness.
And then rib of celery, because again,
it's just the magic of the trinity, the mirepoix.
Season with some salt,
because we're building our flavors here.
Each ingredient deserves to taste the best that it can.
And that means each ingredient needs salt.
So you layer along the way.
I like to hand dice all of my vegetables.
You can also do it in a food prep.
There's no shame in that game.
So now we're gonna let this cook
until the meat starts to brown a little bit.
This should take about five to seven minutes.
Bolognese is not a sauce
that you wanna start on a Monday night at 8:00 PM.
It takes time, it takes patience,
but the building of flavor is worth it.
And it all comes from the technique.
My meat is starting to get a little bit of color on it,
and the vegetables are starting to soften.
So this is only gonna take a couple more minutes
to get just that whisper of golden brown on the meat.
Vegetables, soft all the way through.
So I am pretty much there.
There is starting to get some browning around the edge.
A little bit of garlic goes in about two cloves.
I add it after sweating out the vegetables
and browning the meat a little bit,
'cause you don't wanna overcook and brown the garlic
and risk it tasting bitter.
I'm scraping up all the bits
that might be sticking to the bottom a little bit,
getting the spoon around the side.
Couple minutes longer.
While that's cooking, I'm gonna crush some tomatoes.
So I have a can of San Marzano tomatoes
that I'm gonna hand crush.
And honestly, it helps with finding out
if there's any of those pesky nubs left.
Like you can see right there,
that's actually the little nubbin from the tomato.
You don't wanna bite into that.
Canned tomatoes are picked at their peak
and canned at their peak.
So you always know that you're gonna have that consistent
in-season tomato flavor.
I'm starting to get the browning at the bottom of the pan,
which is exactly what we want.
So now, tomato paste, double concentrate.
About a quarter cup or so
goes in to a little cleared section of the pot
because we wanna toast it.
We wanna bring out all the caramelly goodness
and the natural sweetness of the tomato paste.
And we do that by adding heat to it
and cooking it in some of that oil
that's already in the pan.
You can already see the tomato paste is nice and toasted.
And the color change. Now, I'm mixing it back into the meat.
That brown goodness at the bottom of the pan
known as the fond is starting to stick even more.
So now it's time to deglaze it so that we don't scorch it.
So now we add the milk.
Milk is a pretty classic ingredient
when it comes to making Bolognese.
Milk used to be there just for tenderizing the meat,
because the cut of meat that they would use was so tough.
Now we keep it in there,
because it balances out the acid of the tomatoes.
It adds sweetness and richness to the sauce,
and it still tenderizes the meat slightly,
leaving you with a very silky mouthfeel
when you eat the sauce.
So this is gonna go until the milk is practically
completely evaporated and reduced.
You wanna give it some attention as it does this.
It's gonna take about 20 minutes.
You wanna keep stirring the bottom
so that you don't burn the bottom of the pan.
It's gonna start to look a little almost separated,
and that's okay.
That's what you want actually.
Everything's gonna come together in the end.
It has been about 20 minutes.
And when I tell you that I could stop right here and eat it,
I'm not lying.
The milk is almost entirely evaporated,
but it's changed the look of the meat.
It seems silkier, it seems more velvety.
I can scrape the mixture to a side
and there's not liquid left.
That's your indicator that you're ready for the next step.
I'm going to add about a cup of red wine to the mixture.
This is gonna add depth of flavor. It's going to add acid.
It adds a little character and backbone.
It's layering those flavors.
So now we're gonna let the wine reduce.
It's been about 10 or 12 minutes.
We're back pretty much the same spot
that I was with the whole milk.
It leaves a little clean space in the bottom of the pan.
It's still so silky. Look at that.
So now at this point I'm gonna add my hand crushed tomatoes
over the back of the spoon so that it doesn't splash.
I'm gonna nestle in a little aromatic.
Bay leaf adds almost a grassy eucalyptus note to it.
So I just use dry bay leaf.
So now the secret ingredients is the Parmesan rind,
which is completely edible.
And we're gonna throw it in the sauce
so that all of that nutty goodness from the cheese
hold that flavor, comes and get the sauce.
So I'm taking about half of that rind,
nestling that in there along with the bay leaf.
Tuck it away. I'm gonna see where we're at on seasoning.
I'm gonna add just a little bit of salt
'cause it's gonna reduce.
So I don't wanna season too much now,
but I still want all of the ingredients
to taste the best that they can.
Now I'll let it simmer for about two hours.
You still wanna give it a stir,
maybe every 15-20 minutes or so
just to prevent it from burning at the bottom of the pan.
So this sauce looks perfect right now. It is reduced.
You can see that it's all about the meat.
The texture is beautiful and silky.
This is gonna be perfect
picked up with some tagliatelle or pappardelle,
any kind of thicker flat noodle, perfection.
[gentle music]
The marriage of the sauce and pasta together.
You toss it together so that the sauce coats the pasta.
It's not just on top.
It's a whole dance that happens in the pan
that makes the magic happen.
The sauce Bolognese is ready to use
however you want to use it.
However I want to use it.
And in this case, it's gonna be with pasta tagliatelle.
Generously season our pasta water.
This is your one opportunity to season your pasta.
The pasta is gonna absorb the water.
So I'm just gonna drop in some fresh tagliatelle here.
Two bunches.
A flat wide pasta is the best to use for this sauce
because it clings to the pasta incredibly well.
While the pasta cooks,
I am going to warm up some pasta sauce, our Bolognese.
In Italy, you would never get pasta
that just has sauce plopped on top.
It's always tossed. It needs to coat the pasta.
I'm gonna turn on this burner,
warm the sauce up a little bit.
I'm adding a little bit of pasta water
just to loosen it and help warm it through.
It's probably maybe about a quarter of a cup's worth.
Pasta should be close. Let's see what we got.
Love.
Pasta in.
Oh my goodness.
So imagine if you just put the sauce on top,
then you have to take the pasta,
you have to take some sauce
You have to make your bite, right?
This way, every single piece of pasta
is coated in the sauce.
This is the love, people.
A little bit more pasta water
'cause we want it to coat well.
Little bit of olive oil.
So you really just wanna toss the pasta around.
You can do this with tongs or you can do the flip.
If you don't feel comfortable with the flip,
don't worry about it, tongs are your best friend.
You just wanna make sure
that the pasta is coated in the sauce.
We are about there.
I'm gonna add some Parmigiano Reggiano
to finish at the end here.
Once this is added in, I'm gonna turn off the heat
because you don't wanna continue to cook the cheese.
You just wanna toss it with the pasta. Oh my God.
All right, we're ready to plate. Look at this, huh?
Every strand is coated in the sauce.
I mean...
Oh, yeah.
Just a little nest.
A showering of Parm-Regg.
This is my perfect bowl of pasta Bolognese.
Yes.
Let me tell you, the flavors of this Bolognese,
it's sweet. it's savory.
You taste every single step.
The flavors that you've built throughout the process.
You took your time, you did it right, and it shows.
This is a pasta sauce that I have made many, many times
in my career, in my life, and it never gets old.
To me, this is the real way to make Bolognese,
and it really pays off.
[gentle music]

The Best Way To Carve A Whole Chicken

The Best Way To Clean and Season a Cast Iron Skillet

The Best Way To Sharpen & Clean Knives (And The Worst)
16 Ways To Peel & Cut Garlic Like A Culinary Instructor

The Best Way To Make French Fries At Home (Restaurant-Quality)

The Best Ways To Cook Bacon (And The Worst)

The Best Way To Fillet A Whole Fish

The Best Ways To Peel & Cut Onions (And The Worst)

The Best Ways To Make An Omelet (French & American)

The Best Way To Make Chicken Stock

The Best Way To Deep Fry Anything

The Incredible New Way to Poach Eggs that NEVER Fails

The Best Way To Make Pasta From Scratch
The 9 Essential Knife Skills To Master
The No-Fail Way To Sear Any Meat Perfectly

The Best Mashed Potatoes You'll Ever Make

Cooking Tips For Kitchen Beginners

The Best Way To Make Perfect Pancakes

How to Make Restaurant-Quality Mac and Cheese at Home

The Best Tomato Sauce You'll Ever Make (Restaurant-Quality)

The Best Salad You'll Ever Make (Restaurant-Quality)

The Best Fried Rice You'll Ever Make (Restaurant-Quality)

The Best Way To Make Sushi At Home (Professional Quality)

The Best Roasted Potatoes You'll Ever Make (Restaurant-Quality)

The Foolproof Way To Make Rice Like A Master Sushi Chef

The Cacio e Pepe Hack That Never Fails (Ft. Binging with Babish)

The Best Pizza You'll Ever Make
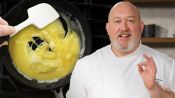
The Most Perfect, Silky, Creamy Scrambled Eggs You'll Ever Make

The Best Buffalo Wings You'll Ever Make (Restaurant-Quality)

The Best Tonkatsu You'll Ever Make (Restaurant-Quality)

The Best Chicken Breast You'll Ever Make (Restaurant-Quality)

The Best Grilled Cheese You'll Ever Make

The Best French Toast You'll Ever Make (Restaurant-Quality)

The Best Salmon You'll Ever Make (Restaurant-Quality)

The Best Potato Salad You'll Ever Make (Deli-Quality)

The Five Knives You Need In Your Kitchen (And How To Use Them)

These 5 Sauces Will Upgrade Your Weeknight Meal Game
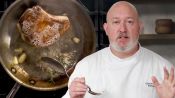
The Best Pork Chop You'll Ever Make (Restaurant-Quality)

The Best Fried Eggs You’ll Ever Make

The Best Stuffing You’ll Ever Make

The Best Gravy You'll Ever Make

The Best Chilaquiles You’ll Ever Make (Restaurant-Quality)

The Best Guacamole You’ll Ever Make (Restaurant-Quality)

The Best Chocolate Cookies You’ll Ever Make

The Best Mexican Rice and Beans You’ll Ever Make

The Best Mexican Chicken Tacos You’ll Ever Make

The Best Sandwich You’ll Ever Make (Deli-Quality)

The Best Lasagna You'll Ever Make (Restaurant-Quality)

The Best Ways to Reheat Leftover Pizza (And the Worst)

The Best Queso You'll Ever Make is Queso Fundido

The Best Tortillas You Can Make at Home

The Best Salsa You'll Ever Make

The Best Pasta Carbonara You'll Ever Make (Restaurant-Quality)

The Best Fried Chicken You'll Ever Make
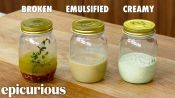
These 3 Dressings Will Upgrade Any Salad

The Michelin-Star Way to Make Salmon at Home

How to Make the Perfect Biscuits at Home

The Best Hamburger You'll Ever Make

These 3 Dips Will Level Up Any Dinner Party

The Best Steak You'll Ever Make (Restaurant-Quality)

The Best Grilled Chicken You'll Ever Make (Restaurant-Quality)

The Secret to Perfect Boiled Eggs (Soft, Jammy, Hard)

5 Garlic Techniques That Will Up Your Game

The Best Spaghetti and Meatballs You'll Ever Make (Restaurant-Quality)

The Best Pasta Bolognese You'll Ever Make (Restaurant-Quality)

The Best Prime Rib You’ll Ever Make (Restaurant-Quality)

The Best Fettuccine Alfredo You’ll Ever Make (Restaurant-Quality)

The Best Chocolate Chip Cookies You’ll Ever Make (Bakery-Quality)

The Best Brownies You'll Ever Make (Bakery-Quality)

The Best Chili You’ll Ever Make (Restaurant-Quality)

The Best Roast Chicken You’ll Ever Make (Restaurant-Quality)

The 6 Rules of Plating Used in Restaurants | Epicurious 101

The Best Way to Clean and Season a Wok

Why Stir Fry is Better in Restaurants (And How to Do It At Home)

Why Steaming is Better for Your Food (And How to Do It At Home)

The Best Mac and Cheese You'll Ever Make (Restaurant-Quality)

The Best Omelet You’ll Ever Make (Restaurant-Quality)

3 Corn Recipes to Level Up Your Cooking

The Best Cheeseburger Sliders You’ll Ever Make
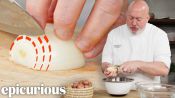
29 Vegetable Tips Every Home Cook Should Know

7 Microwave Hacks Every Home Cook Should Know

Why American Cheese is a Pro Chef’s Secret Weapon

How to Make Perfect Pie Crusts for Thanksgiving

Recipes for a Perfect Thanksgiving Feast

For The Best Chicken Tikka at Home, Use an Air Fryer

The Best Enchiladas You’ll Ever Make (Restaurant-Quality)

The Best Carne Asada Tacos You’ll Ever Make (Restaurant-Quality)

7 Pasta Recipes Every Home Cook Should Know

The Best Nachos You’ll Ever Make (Restaurant-Quality)